orange oranges

It’s true that I have posted all but one of these photos before, just not all together. Given my recent run on orange photos, I felt compelled to share some of my favorite orange photos.


One of my favorites from my year of Project 365. This was when I was playing around with long exposures and motion blurs.


Having recently shared photos of an orange flower, it brought to mind this photo I took of the very flower-like shape on the stem end of a clementine.


Here’s that same clementine, but without the macro lens.


Also from Project 365, when I played with perspective. I would love to try this one again some time.


My snack scraps, beautifully catching the afternoon light earlier this year.


A more recent macro photo.

leaves of pink

I mentioned yesterday that a Japanese maple tree in my neighborhood, now looking quite orange, once produced fall leaves of a surprising pink color. Here are a few photos I took in the late fall of 2012.

Two fallen pink and purple leaves among the duller hues of the oak leaves.

I was also quite taken by the complex pattern and varying shades of pink, on the leaves, looking like a mosaic, or fish scales.

These photos were from November, so there is clearly quite a bit more time for this year’s leaves to change color. I’m rather curious to see what they’ll do.

more multi-colored leaves

I’m thinking of changing the name of this blog to “collecting leaves.” Not really. But I do seem to be sharing quite a few leaves. What can I say? It’s fall, and I live in New England. The leaves put on a show, and I am a captive audience member. Who likes to take pictures.

There are fewer colorful leaves on the trees these days, as the chilly winds of November have blown in and cleared most of the trees. Most of these photos were taken over the last few weeks.


Looking up at the layers of red and green oak leaves in my yard.


This plant is pretty as much for the berries as for the leaves. This is the same type of plant whose leaves looks so purple in my other leaf post.


This plant couldn’t make up its mind about what color to wear, so it decided to try out a different look on each leaf.


I like the way these leaves fell in line on the brick sidewalk in Cambridge, MA.


I was drawn to the flame-like colors of this lone leaf at the playground. (I think it’s some kind of maple leaf, but I’m not entirely sure.)


These leaves are in the shrub at a friend’s house. I was quite taken by what looks a bit like a tan line on one of the leaves. (The yellow triangle on an otherwise red leaf looks like it was a result of the leave below it having previously been on top of it.)

full-color fall color

With the gray days of winter looming in the not too distant future, my eyes are savoring the flashy colors of fall. The New England trees are putting on as lovely a show as ever, but the vines and shrubs and even some of the weeds are competing for attention.
red leaves

orange leaves

yellowish leaf

green and red spotted leaves

purple leaves

The first 4 photos are ones I’ve taken with my phone in the last few weeks. The fifth photo is actually one I took with my camera a couple of years ago. I have some more recent photos of this same type of leaves and berries, but the leaves weren’t nearly as purple.

green spaces of Hong Kong (friday foto finder: green)

Hong Kong, one of the most densely populated cities in the world, is known as an urban jungle. But the territory also boasts a wide range of green spaces, which more closely resemble “jungle” than “urban jungle.” When I visited Hong Kong in 2011 for a conference, I enjoyed exploring the urban jungle, and also managed to see a few of the greener spaces. The highlight of these excursions was a hike with my friend YTSL, a Hong Kong local who knows her way around the green spaces of Hong Kong. We met up and took a series of subway rides and buses out to Wong Shek, on the Sai Kung Peninsula. (I wouldn’t have remembered exactly where it was we went, but happily YTSL mentioned it in her post shortly after our hike.)

The day was hot and humid, and also very hot and really humid, but I managed not to pass out. I also managed to take several hundred photos. (Pausing to take a photo is a good way to catch one’s breath.) Did I mention that it was hot and humid? It was all entirely worth it, as the views were stunning, and I appreciated them even through the heat and humidity.

The blue skies were filled with fluffy white rather expressive-looking clouds.

Below the blue and white there was plenty of green to be seen.

There were splashes of other colors, too, among the green fronds.

The path was sometimes narrow, sometimes not, sometimes paved, sometimes not. But always surrounded by green.


A particularly photogenic cloud poses for the camera, trying to steal attention from the picturesque rocks, water and greenery.

We passed a small number of homes which appeared to be inhabited, and more that were clearly long abandoned.

Some of the abandoned buildings were taken over by green.

Our hike finished up with a ferry ride back to our starting point, which offered plenty more beautiful views of green peaks. (A few more photos from the excursion are included below, in the slideshow. And several hundred more are still on my laptop.)

This post was brought to you by the color green, which was week’s friday foto finder theme . Green abounds in my photo library, especially of the local greenery, but it seemed a good excuse to get back to posting some of my long-promised travel photos. To see what other green can be seen, stop by the fff blogfff 200x60

This slideshow requires JavaScript.

rainbow cupcakes


Over the last couple of years, and several cupcake productions, I came up with a method for making rainbow-topped cupcakes that is easy, fun, and very colorful. (Did I mention they have rainbows? We’re big fans of rainbows in this house.)

What you’ll need:

  • cupcakes (duh)
  • frosting, preferably in a light color (I make the standard butter cream frosting based on the recipe on a package of powdered sugar)
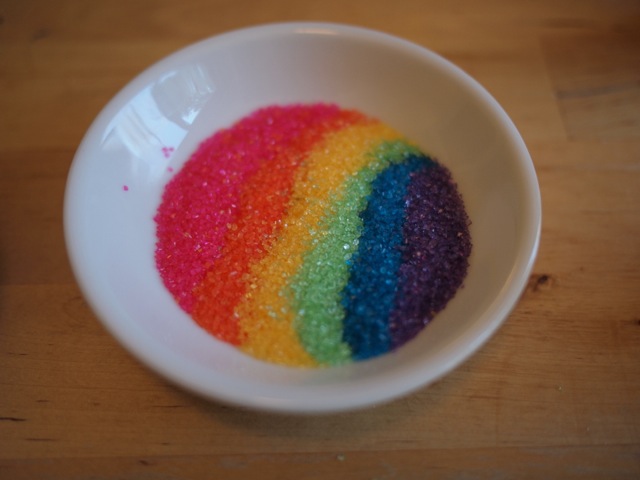
  • decorating sugar in a range of rainbow colors (also called sugar crystals or sugar sprinkles) I used bright pink, orange, yellow, light green, light blue and purple
  • (optional) other candy decorations
  • one or more small round dishes (soy sauce dishes are ideal, as they are the right size for cupcakes, and have a slight curvature)

What to do:
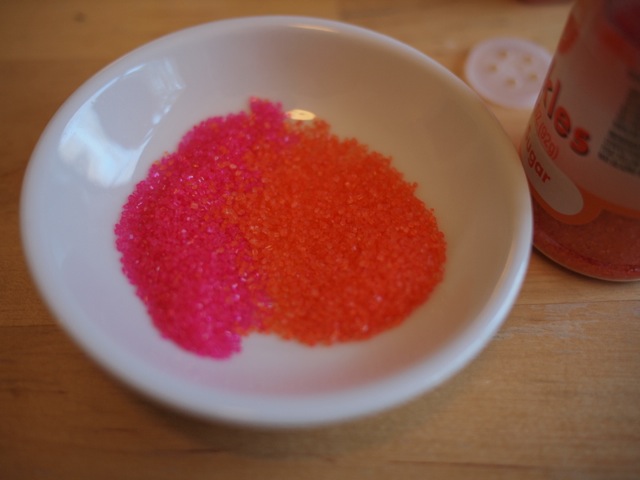
1. Pour out a small amount (about 1 teaspoon) of single color of sugar into the soy sauce dish.
2. With a finger, nudge the sugar over to one side of the dish, making a thick line. Don’t worry too much about shaping it.

3. Pour in your next color, and again nudge the sugar. The sugar will start to look like stripes.

4. Repeat with each of your next colors until either you have no more room, or until you have put in as many stripes as you like.

Repeat with multiple dishes if you want to make a production line.

5. Frost a cupcake, or a few cupcakes.

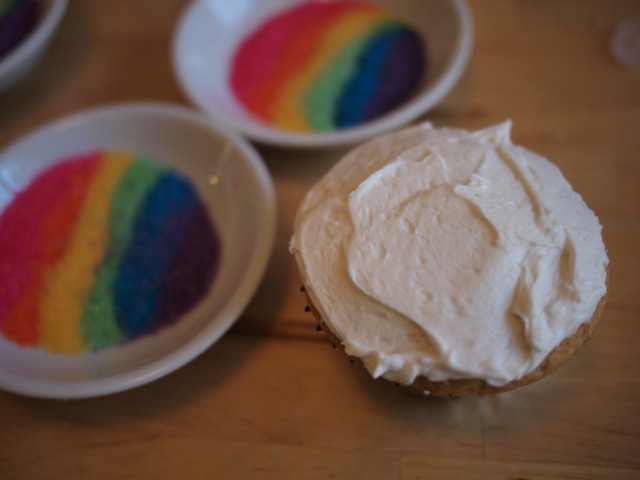
6. Invert the cupcake, and carefully lower onto the sugar stripes. Gently roll it around, pressing lightly, so that the whole top of the cupcake makes contact with the sugar.

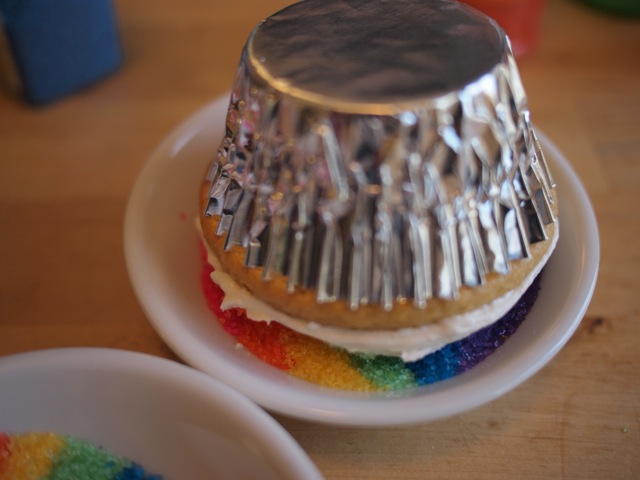
7. Turn it back right-side up and admire the rainbow. (Here’s where I seem not to have taken a photo.)

If you want to add other candy sprinkles (like these stars), sprinkle a handful onto the top of the sugar stripes. (You’ll need to put the candy sprinkles again each time you dip a cupcake, but the rainbow stripes will last a few dips.)


This time I remembered to take a photo.

8. Frost another cupcake and dip it. With each dipping, the sugar stripes will shrink a bit. You can experiment with rolling the cupcake top around to make different patterns with the stripes. When the sugar gets low, push the stripes aside and start adding more stripes (like in steps 1 through 4.) Or, if you want to keep the stripes more even, you could dump out your sugar and start fresh in your dish. As for me, I enjoyed seeing the way the stripes shifted with each cupcake, and the patterns that emerged from adding additional stripes as the sugar in a dish ran low.

You can see here that the stripes vary, with the colors being more curvy in some parts, or more tightly spaced.

9. I also added white chocolate unicorns to the tops, after the sugaring. (I made these in advance with one of these unicorn candy molds. They were probably more trouble than they were worth, but I am a glutton for punishment. Unicorn-shaped sugary sweet punishment.) These needed a dab of frosting to stick to the cupcakes.

Notes:

  • I don’t know how long it takes to do this project. It’s probably faster if you don’t stop to take pictures a gazillion times. I think it took a good hour, but it was fun.
  • I could imagine doing this as a project with kids, especially if you are flexible about how the stripes will turn out. (And also if you anticipate needing to clean up a lot of spilt sugar.)
  • You could also experiment with making other stripe-based patterns with the sugar, such as for holiday themes (eg. red, white and blue or whatnot) or just in some favorite colors
  • While I’m not super thrilled about using all this artificial color, it does strike me that the sugar-sprinkle topping probably has less food coloring than you’d use to make saturated color frosting, or that you might use to make, e.g., rainbow cake batter. You might also try using natural dye colored sugars, such as those from India Tree.

Other Tips:

  • Wait to frost the cupcakes until you have the sugar ready. You’ll need the frosting to be freshly spread to get the sugar to stick. (If you do frost the cupcakes earlier, or use pre-fosted ones, try giving the frosting a bid of spreading with a knife.)
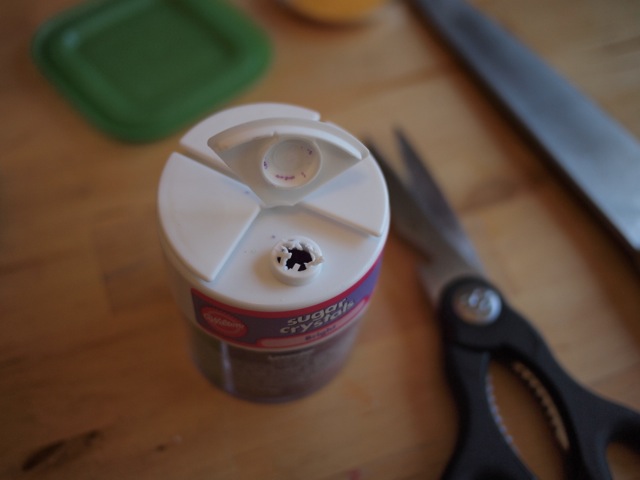
  • If your sugar came in a container with a shaker top (with little holes), remove the shaker insert to pour. (Or, if you have the kind of container that has the shaker built in, you might want to make the holes bigger using a knife or kitchen scissors. Shaking it out will be tedious and you will feel like stabbing something anyhow. If you do not want to mess with the integrity of your shaker, or if the hole is still too small to really pour, shake your sugar into a separate bowl, and then pour into your soy sauce dish when you have a good amount. If you shake into the soy sauce dish directly, the sugar will fly everywhere, and the integrity of your stripes will be breached.)

  • Why do they do this?


    I was lucky not to have injured myself in this step. They also make sugar that comes in separate jars, which is easier to pour.


These were some that I made a couple of years ago. At the time, I was attempting tie-dye cupcakes. They evolved into rainbows.

water colors

These are all photos from today, from both ends of my commute home. (Well, the sunset ones were from a stop on my way home. It was dark by the time I actually got home. Come to think of it, it was a really long commute home. I left Boston at 3:00, picked up Theo at his school just after 4, then had to collect Phoebe at her school at 4:45. We hung out for a bit at the school, and it was 5:30 by the time we got home.)

In case you couldn’t tell, it was rainy today.